The Flash 9 player using ActionScript 3 (for Flex or Flash), has an internal structure called a display list. Items in the display list, will be shown, items not in it will not be shown. So if you load an external SWF, it will not be visible until you add it to the display list. Once it is in the display list, it'll receive events (like MouseEvents, KeyboardEvents, ENTER_FRAME, and so on). That's nice, because you can load it and display it at will.
But what about a SWF that also contains audio? As it turns out, there is no audio equivalent to the display list. Once a SWF containing audio is loaded, it will begin to play and you'll hear the audio, whether or not you're displaying it. To stop the audio, listen for Event.INIT on the loaderInfo in the Loader object. Event.INIT fires when the first frame is loaded so you can call stop() it to prevent the playback head from moving forward in the timeline.
Sunday, April 13, 2008
Something I love about open source
I was just re-reading through the Blender release logs and for version 2.45 (the current one):
The 2.45 is a bugfix release, to stabilize the 2.4x series.
No new feature have been added, but serious effort has been put in tracking bugs and fixing them. Some performance issues have also been addressed.
Years ago, when I was used Director daily, I don't know how many times I read posts crying for a release that just addressed bugs. Skip new features. I guess the business folks at Macromedia (now Adobe) couldn't makes sense of the importance of stability to users. Blender is one of the most stable pieces of software I use. When you're trying to get a job done, stability is paramount.
Tuesday, April 01, 2008
Blender Basics 2
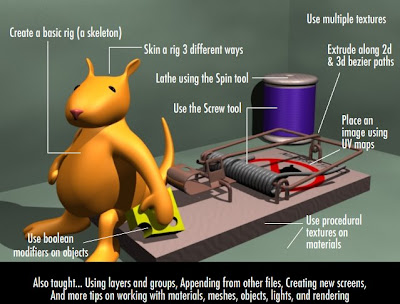
Blender Basics 2 was released today by CartoonSmart (no foolin')! BB2 is 4 hours (twice as long as Blender Basics!). In BB2 you learn how to:
- Use procedural textures on materials
- Place an image using UV maps
- Use the Screw tool to create corkscrew extrusions (like springs)
- Use multiple textures
- Extrude along 2d and 3d bezier paths
- Lathe using the Spin tool
- Create a basic rig (a skeleton)
- Skin a rig 3 different ways
- Use boolean modifiers on objects
- Use layers
- Use groups
- Append from other files
- Create new screens
- and more tips on working with materials, meshes, objects, lights, and rendering
The video high quality, it is compressed using the H.264 codec at Best quality, Millions, 1024x768. The audio is AAC 44.100kHz. The only place to get it (legally) is CartoonSmart.com. Just as we did for Blender Basics!, CartoonSmart.com and I will be donating a percentage of the profits to the Blender Foundation to support further development of Blender.
Thursday, March 27, 2008
DNA script

After writing the script I posted in the previous blog, it occurred to me that I should be able to create all the nucleotides with a script, not just color them. So I poked around in the Blender Python APIs and came up with the following:
import random, math
import Blender
from Blender import Object, Scene, Material

scn = Scene.GetCurrent()
colors1 = [Material.Get("G_Nucleotide"), Material.Get("C_Nucleotide")]
colors2 = [Material.Get("A_Nucleotide"), Material.Get("T_Nucleotide")]
groups = [colors1, colors2]
for i in range(0, 90):
    rot = i*.125*math.pi
    o = scn.objects.new(Object.Get("nucleotide").getData())
    o.colbits = 1
    o.modifiers = Object.Get("nucleotide").modifiers
    o2 = scn.objects.new(Object.Get("nucleotide").getData())
    o2.colbits = 1
    o2.modifiers = Object.Get("nucleotide").modifiers
    groupNum = random.choice([0,1])
    firstColorNum = random.choice([0,1])
    if firstColorNum == 0:
        secondColorNum = 1
    else:
        secondColorNum = 0
    firstColor = groups[groupNum][firstColorNum]
    secondColor = groups[groupNum][secondColorNum]
    o.LocZ = i*.2
    o.RotZ = rot
    o.setMaterials([firstColor])
    o2.LocZ = i*.2
    o2.RotZ = rot + math.pi
    o2.setMaterials([secondColor])
scn.update()
Python is one of the more unique languages I've worked with. After my initial shock at being forced to indent, I've now found I like it. I'd do it anyway, but now it is sure to be done and done consistently. It makes for reading my code and others' code much nicer. As I get used to syntax and familiar with the Python and Blender APIs, I find I am looking for more excuses to use it. :)
For one of my future courses, I'd like to teach how to program... using Python as the language and Blender as the environment. This would be for folks who want to learn to program, but haven't a clue were to start. It's nice to be able to solve some of the more tedious tasks (like creating and coloring nucleotides) programmatically.
Another course I'd like to teach is one on the Blender Game Engine. With the logic bricks, you can do a lot of programming logic without getting into the syntax issues you get in a language. A cool thing in Blender is you can extend the logic bricks by calling Python scripts.
About the image: The image above has over 1200 objects, but only one mesh. Each object reference the same mesh (making changes easy). I applied the Material color to the object (not the mesh, which is the default). By using a script, I was able to apply the colors randomly but following the rules that the A color had to go with T (or T with A) and the G color had to go with C (or C with G). Since all the nucleotides of the same color share the same Material, color and texture changes are also easy.
Wednesday, March 12, 2008
Blender Materials and Python

I spent some time tonight working with Blender on an illustration of DNA. At first, I thought it would be straightforward... I soon realized there were many challenges. The biggest was setting up the nucleotides. They have to be four different colors, representing the pair A and T, as well as C and G. The pairs need to go together. Since there were so many of them, I thought this was a good time to do a little Python. After poking around in the APIs, I found where I could set the Object's material. I ran my script and nothing seemed to happen. As it turns out, Blender can associate a material with an object or a mesh. By default it associates with a mesh and it seems that the mesh material takes precedence over the object material. A small change to the code and I got it working. Here's the program:
import Blender
from Blender import Material, Mesh

objects = Blender.Object.GetSelected()
mat = Material.Get("T_Nucleotide")

for curObj in objects:
  n = curObj.getData()
  n.materials = [mat]
  n.update()
  curObj.layers = [5]
The code starts out with the import statements to use the Blender, Material, and Mesh modules. Next it gets all the selected objects (this way I could click on the ones I want to change). Then it sets a variable to the material I want to use. I loop through the list of objects getting the mesh data, then setting its materials. Note that the materials property is actually a list of materials, so I add the brackets around the material variable. I call update() so the screen is updated. Lastly, all the ones that were changed I move to layer 5. The layers property is list, this is a neat feature of Blender... unlike most graphics programs where an object can only reside on one layer at a time, in Blender you can set the object to appear on multiple layers. Turns out to be very useful.
Monday, March 10, 2008
FlexBuilder vs FlashDevelop
I've been using both FlexBuilder and FlashDevelop at work lately. I'm a long time FlashDevelop user, so I've a little bias towards it. Lately, I've been trying to look at FlexBuilder with regards to its strengths. I've found that if I am doing a lot of MXML coding, FlexBuilder is a better tool. You have a class view of the MXML and it is good about hinting for MXML attributes. If you need to do absolute positioning, FlexBuilder also wins because of it's WYSIWYG editor.
But when it comes to ActionScript 3 coding, I'd much rather be in FlashDevelop. FlashDevelop's code hinting is much more powerful, for example it does NOT require you to type exactly the right characters. It's a breeze to jump around to declarations of code as well as nice features for creating getters/setters, promoting local variable to member variables, and creating event handlers. The look and feel of FlashDevelop is also nice, it launches and runs quickly. It has good defaults, a user-friendly UI, and good choices for fonts (I guess that could fall under "good defaults"). FlashDevelop is also free.
But when it comes to ActionScript 3 coding, I'd much rather be in FlashDevelop. FlashDevelop's code hinting is much more powerful, for example it does NOT require you to type exactly the right characters. It's a breeze to jump around to declarations of code as well as nice features for creating getters/setters, promoting local variable to member variables, and creating event handlers. The look and feel of FlashDevelop is also nice, it launches and runs quickly. It has good defaults, a user-friendly UI, and good choices for fonts (I guess that could fall under "good defaults"). FlashDevelop is also free.
Monday, March 03, 2008
Blender Basics Course

My first course for CartoonSmart.com was launched today: Blender Basics! I've been a fan of CartoonSmart.com's Flash tutorials for many years, so I was honored to be asked to do Blender courses. CartoonSmart.com produces high quality training for a great price.
Blender Basics is for folks who've never used Blender before. It is a gentle introduction to a very powerful, open source, 3d program. In it I try to address the concerns I had when I first downloaded it. The interface is very different than most Mac or PC programs. Once you learn the basics though, you'll like it. It is very fast and highly configurable.
After learning some of the basics of the interface, interacting in the 3d space, setting up your workspace, saving and loading, I show you how to make a 3d character scratch, just starting with a sketch. I cover modeling and finish up with introduction to materials and rendering.
The video high quality, it is compressed using the H.264 codec at Best quality, Millions, 1024x768. The audio is AAC 44.100kHz. The only place to get it (legally) is CartoonSmart.com. CartoonSmart.com and I will be donating a percentage of the profits to the Blender Foundation to support further development of Blender.
Subscribe to:
Posts (Atom)