Did you know you could use text boxes/frames in Blender? John and Richard show you how in this Bit.
Showing posts with label 3d. Show all posts
Showing posts with label 3d. Show all posts
Sunday, December 29, 2013
Sunday, December 08, 2013
Wednesday, October 30, 2013
Weather won't stop Blenderheads

Seven Blenderheads braved some cold, wet Colorado weather to come out for some hot coffee at the CBUG meeting at the Fika Coffeehouse. Clockwise from the left: Ryan, Ben, Ben, Chris, Richard, and Harrison (with me behind the camera), thanks guys for coming out!
Sunday, January 31, 2010
Bits of Blender #39 and #40
My boy, Richard, and I have come out of a long hiatus. We just made two new episodes of Bits of Blender. We're getting back into the swing of things so pardon any rough edges. We're doing some things a little differently, the biggest change is we now publish at at higher resolution. I am also (finally) giving Vimeo a try (I've had an account forever but hadn't taken the time), they look so nice there.
For those of you not familiar with "Bits", it is a set of casual tutorials done by my 10-year old and me. We do them both for fun and to serve as a video reference of many Blender features. We're warming up so we are ready for 2.5. These cover in 2.49b. Enjoy!
Bits of Blender #39 - Environment Maps
For those of you not familiar with "Bits", it is a set of casual tutorials done by my 10-year old and me. We do them both for fun and to serve as a video reference of many Blender features. We're warming up so we are ready for 2.5. These cover in 2.49b. Enjoy!
Bits of Blender #39 - Environment Maps
Saturday, August 02, 2008
Blender to Acrobat 3D

A co-worked was talking about Acrobat 3d yesterday. It sounded cool so I had to try it!
The first thing I found out was Acrobat imports the Universal 3D (U3D) format. Looking at my export options in Blender, I did not see an option for that. So a quick Google brought me to the open source MeshLab. With MeshLab I was able to export the BLEND to OBJ and then convert U3D. That worked on a simple model (a cube with a UV), but crashed repeatedly when I tried a more complicated model.
Searching further, I found out the free (but not open source) DAZ Studio exported U3D. I use DAZ and I like it. So I brought my OBJ into DAZ (no problem) and exported the U3D. DAZ exported a large file very fast!
Then I went into Acrobat Profession 8, opened a document, went to Tool=>Advanced Editing=>3D Tool. With the 3D Tool, draw a box into which you will import your U3D.
You can see a quick test of the Blender Basics mouse in Acrobat here. I didn't do any tweaking to the lighting or materials after bringing it into DAZ via the OBJ format, it is just a straight import/export with no finessing: Blender=>OBJ=>DAZ=>U3D=>Acrobat.
Monday, June 23, 2008
Blender Game Engine
As I begin work on my next CartoonSmart.com tutorial, I decided to give my boy (and co-host of Bits of Blender) a first taste of the Blender Game Engine. Even starting with the very basics, he had a blast. Making something from scratch move, applying physics, knocking things down, what fun!
One of the things that is unique about Blender as a 3d modeling/animating/rendering package is that it also includes a game engine. In fact, if you ever accidentally hit the "P" key, you've experienced the game engine. Even more interesting is that there are two ways to program Blender games that work nicely in concert. One way, is visual using what Blender calls "Logic Bricks". The other way is textural, using the Python programming language. Blender has Python built in and even includes a text editor! Funny how I seem to get more excited over that than the game engine, but really I'm excited about both.
The nice thing about the game engine is that it is useful for gaming but can also be useful for animation. How? Blender allows you to record what happens while the game engine is running. It records it onto the IPO curves of the objects.
I've said it before... Blender is deeeeeeeep. There is so much it has in it. And it is stable. And addictive... ;-)
Wednesday, June 11, 2008
More Bits of Blender
After getting Premiere Elements working again, I added three more Bits of Blender. I also wanted to say "thanks" to Jay Shaffer for coming up with the music intro to BoB!
Monday, June 09, 2008
Blender Triology
 CartoonSmart.com is offer all three of my Blender videos, over 9 hours of training, as a package-deal for $40! This is a savings of $15. But if you do just need one, check out the 3d page for all the 3d courses at CartoonSmart.com.
Friday, May 30, 2008
Big Buck Bunny!

Big Buck Bunny premiered on the web today AND I got the DVD today as well! The 10-minute short created with Blender turned out great! I'm looking forward to exploring the DVD, which not only has the movie but also has the files used to create the movie. Even more amazing when you think that it was done with open source software that is only 9mb to download. Also cool was seeing my name in the HUGE list of credits for folks who purchased the movie before they started making it, I think our confidence in Blender and Ton's group paid off :)
Tuesday, April 01, 2008
Blender Basics 2
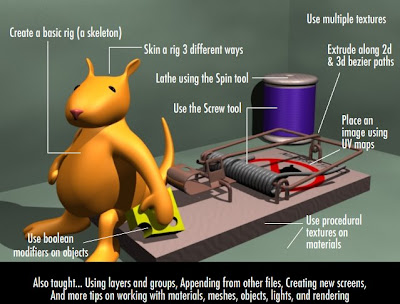
Blender Basics 2 was released today by CartoonSmart (no foolin')! BB2 is 4 hours (twice as long as Blender Basics!). In BB2 you learn how to:
- Use procedural textures on materials
- Place an image using UV maps
- Use the Screw tool to create corkscrew extrusions (like springs)
- Use multiple textures
- Extrude along 2d and 3d bezier paths
- Lathe using the Spin tool
- Create a basic rig (a skeleton)
- Skin a rig 3 different ways
- Use boolean modifiers on objects
- Use layers
- Use groups
- Append from other files
- Create new screens
- and more tips on working with materials, meshes, objects, lights, and rendering
The video high quality, it is compressed using the H.264 codec at Best quality, Millions, 1024x768. The audio is AAC 44.100kHz. The only place to get it (legally) is CartoonSmart.com. Just as we did for Blender Basics!, CartoonSmart.com and I will be donating a percentage of the profits to the Blender Foundation to support further development of Blender.
Thursday, March 27, 2008
DNA script

After writing the script I posted in the previous blog, it occurred to me that I should be able to create all the nucleotides with a script, not just color them. So I poked around in the Blender Python APIs and came up with the following:
import random, math
import Blender
from Blender import Object, Scene, Material

scn = Scene.GetCurrent()
colors1 = [Material.Get("G_Nucleotide"), Material.Get("C_Nucleotide")]
colors2 = [Material.Get("A_Nucleotide"), Material.Get("T_Nucleotide")]
groups = [colors1, colors2]
for i in range(0, 90):
    rot = i*.125*math.pi
    o = scn.objects.new(Object.Get("nucleotide").getData())
    o.colbits = 1
    o.modifiers = Object.Get("nucleotide").modifiers
    o2 = scn.objects.new(Object.Get("nucleotide").getData())
    o2.colbits = 1
    o2.modifiers = Object.Get("nucleotide").modifiers
    groupNum = random.choice([0,1])
    firstColorNum = random.choice([0,1])
    if firstColorNum == 0:
        secondColorNum = 1
    else:
        secondColorNum = 0
    firstColor = groups[groupNum][firstColorNum]
    secondColor = groups[groupNum][secondColorNum]
    o.LocZ = i*.2
    o.RotZ = rot
    o.setMaterials([firstColor])
    o2.LocZ = i*.2
    o2.RotZ = rot + math.pi
    o2.setMaterials([secondColor])
scn.update()
Python is one of the more unique languages I've worked with. After my initial shock at being forced to indent, I've now found I like it. I'd do it anyway, but now it is sure to be done and done consistently. It makes for reading my code and others' code much nicer. As I get used to syntax and familiar with the Python and Blender APIs, I find I am looking for more excuses to use it. :)
For one of my future courses, I'd like to teach how to program... using Python as the language and Blender as the environment. This would be for folks who want to learn to program, but haven't a clue were to start. It's nice to be able to solve some of the more tedious tasks (like creating and coloring nucleotides) programmatically.
Another course I'd like to teach is one on the Blender Game Engine. With the logic bricks, you can do a lot of programming logic without getting into the syntax issues you get in a language. A cool thing in Blender is you can extend the logic bricks by calling Python scripts.
About the image: The image above has over 1200 objects, but only one mesh. Each object reference the same mesh (making changes easy). I applied the Material color to the object (not the mesh, which is the default). By using a script, I was able to apply the colors randomly but following the rules that the A color had to go with T (or T with A) and the G color had to go with C (or C with G). Since all the nucleotides of the same color share the same Material, color and texture changes are also easy.
Wednesday, March 12, 2008
Blender Materials and Python

I spent some time tonight working with Blender on an illustration of DNA. At first, I thought it would be straightforward... I soon realized there were many challenges. The biggest was setting up the nucleotides. They have to be four different colors, representing the pair A and T, as well as C and G. The pairs need to go together. Since there were so many of them, I thought this was a good time to do a little Python. After poking around in the APIs, I found where I could set the Object's material. I ran my script and nothing seemed to happen. As it turns out, Blender can associate a material with an object or a mesh. By default it associates with a mesh and it seems that the mesh material takes precedence over the object material. A small change to the code and I got it working. Here's the program:
import Blender
from Blender import Material, Mesh

objects = Blender.Object.GetSelected()
mat = Material.Get("T_Nucleotide")

for curObj in objects:
  n = curObj.getData()
  n.materials = [mat]
  n.update()
  curObj.layers = [5]
The code starts out with the import statements to use the Blender, Material, and Mesh modules. Next it gets all the selected objects (this way I could click on the ones I want to change). Then it sets a variable to the material I want to use. I loop through the list of objects getting the mesh data, then setting its materials. Note that the materials property is actually a list of materials, so I add the brackets around the material variable. I call update() so the screen is updated. Lastly, all the ones that were changed I move to layer 5. The layers property is list, this is a neat feature of Blender... unlike most graphics programs where an object can only reside on one layer at a time, in Blender you can set the object to appear on multiple layers. Turns out to be very useful.
Monday, March 03, 2008
Blender Basics Course

My first course for CartoonSmart.com was launched today: Blender Basics! I've been a fan of CartoonSmart.com's Flash tutorials for many years, so I was honored to be asked to do Blender courses. CartoonSmart.com produces high quality training for a great price.
Blender Basics is for folks who've never used Blender before. It is a gentle introduction to a very powerful, open source, 3d program. In it I try to address the concerns I had when I first downloaded it. The interface is very different than most Mac or PC programs. Once you learn the basics though, you'll like it. It is very fast and highly configurable.
After learning some of the basics of the interface, interacting in the 3d space, setting up your workspace, saving and loading, I show you how to make a 3d character scratch, just starting with a sketch. I cover modeling and finish up with introduction to materials and rendering.
The video high quality, it is compressed using the H.264 codec at Best quality, Millions, 1024x768. The audio is AAC 44.100kHz. The only place to get it (legally) is CartoonSmart.com. CartoonSmart.com and I will be donating a percentage of the profits to the Blender Foundation to support further development of Blender.
Monday, February 04, 2008
Dino Fun

I'm having fun with my new HP Pavilion M8330F. Here I'm testing the limits of rendering in Bryce. The image above rendered quickly. The dinosaurs I got from DAZ. DAZ is a great resource for 3d models. Their DAZ Studio software is similar to Poser, but they give it away. It has some integration with Bryce and they're working on Photoshop CS3 Enhanced integration (the software is in public beta).
I have not had time yet to go through the laborious deactivation and re-installation of the Adobe CS3 Studio yet (the install alone takes hours). So I also used the free Paint.NET to crop the image. Paint.NET is an imaging editing program that is very full-featured, yet only 1.5MB to download. It is fast and has a nice interface, too.
Friday, February 01, 2008
From SketchUp to Bryce
 At the beginning of the year, Mitch Lopata of Lopata Design introduced to me to Google's 3d Warehouse. It has an impressive collection of 3d models that were made with SketchUp. He wanted to use some for reference but his program (Silo), could not open the SKP format, nor could it import the KMZ format (which SketchUp will export to). Knowing I used Blender, he asked if I could import them. As it turned out, Blender right out of the box cannot, but (similar to my ASE scenario) there is a Python script for Blender to read KMZ files. After bringing it into Blender, I was able to export it as an OBJ, which he could then import to Silo. So here are the steps to go from KMZ to OBJ.
- Open SKP in SketchUp
- Export to KMZ
- Import KMZ to Blender
- Export as OBJ
- Open SKP in SketchUp
- Export to KMZ
- Import to Blender
- Export as OBJ
- Import to DAZ Studio
- Open Bryce and click the Launch DAZ Studio button
- In DS select Return to Bryce
About the image: The image above was created with Blender and Bryce. I modeled the face in Blender, imported it into Bryce using the technique above (OBJ to DAZ to Bryce), added materials and rendered in Bryce.
Tuesday, January 15, 2008
Sandy and Blender
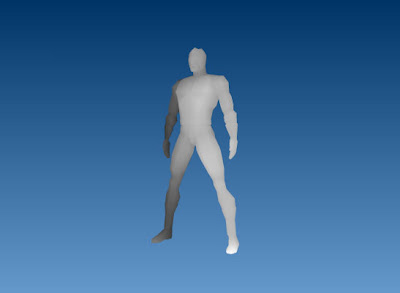 Click on the above image to see a Flash animation. I modeled figure above in Blender, exported to ActionScript 3 using Dennis Ippel's Python script, and then rendered it in Flash using Sandy. It was coded using FlashDevelop. All done with open source!
Tuesday, January 01, 2008
Movies as Backgrounds in Blender
When modeling in 3d, typically you'll use an image as a template. But what about animating in 3d? Blender can use a movie as a background. Just import the movie in the same manner as a background image:
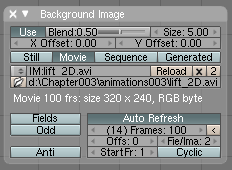 Clicking Auto Refresh is important as that advances the movie when you advance frames in Blender's Timeline.
- Select View->Background Image...
- Click Use Background Image
- Click Load
- Select your movie from the File Browser
- When it loads, click Auto Refresh. I had to move my Background Image window to get it to show the loaded movie.
 Clicking Auto Refresh is important as that advances the movie when you advance frames in Blender's Timeline.
Tuesday, December 25, 2007
How I spent my Christmas vacation

It was only a four day weekend this year, but I still managed to slip in some productive fun. Over the weekend I:
- Wrote my first productive Python script from scratch
- Created a game in Blender using Blender's game engine
- Painted in ArtRage (the picture above, you didn't think I was in that did you?)
- Spent time in Alice
- Opened a Twitter account
Sunday, December 23, 2007
Python and Blender
I was just working on a Blender project where I have 36 objects that I should have set the rigid body property for each. It took several minutes to do manually, was very tedious, and made me realize it was time to learn how to script Blender.
Blender is scriptable through the Python language. I've never scripted Blender and I've never used Python, so it took me a bit... Figuring out the appropriate Blender APIs and then learning the Python syntax (it is very different from what I'm used to like AS3, C# and Java). Here's my tiny, first script:
Blender is scriptable through the Python language. I've never scripted Blender and I've never used Python, so it took me a bit... Figuring out the appropriate Blender APIs and then learning the Python syntax (it is very different from what I'm used to like AS3, C# and Java). Here's my tiny, first script:
import Blender

objects = Blender.Object.GetSelected()

for curObj in objects:
    curObj.rbFlags = curObj.rbFlags | Blender.Object.RBFlags.RIGIDBODY
Taking it apart, the first line imports the Blender module for the Blender APIs. The second line gets all of the selected objects in a scene using the Object module's GetSelected() method. The third and fourth lines iterate through the list of objects. Line 4 uses the bitwise OR operator to set the RIGIDBODY flag for the current object.
It took me a while to figure this little script out, longer than it took to do the operation manually. But the next time I need to set a property of a large number of objects -- any property, bitwise or otherwise -- it'll take seconds to type instead of minutes in the interface.
Subscribe to:
Posts (Atom)